Simple Immobilizer SMD EEPROM Removal and replacement
When you replace your 2001, 2002, or 2003 Toyota RAV4 ECM (engine computer or ECU) with a used or recycled unit, you must reprogram the ECM to work with your existing keys if your vehicle has an immobilizer system (an anti-theft security system).
In this article, we cover removing the immobilizer EEPROM chip from the 2001-2003 Toyota RAV4 ECM circuit for replacement or reprogramming. This applies to 4WD or 2WD models and automatic or Manual transmission models.
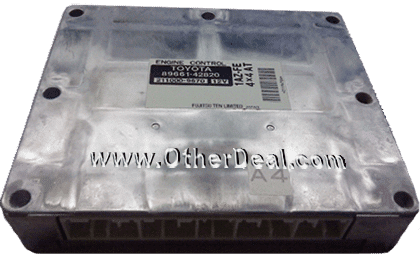
Before programming the ECM, you should know there is a simple process car owners can do themselves to synchronize the ECM’s immobilizer data with the vehicle’s immobilizer system. We call it the Toyota sync process, and it does exactly what its name suggests: synchronizing the new ECM’s (replacement) immobilizer data with the vehicle’s immobilizer system data. This sync process is described in the article at the link below, and while it is for the Toyota Corolla, it’s the same process for the RAV4 and covers all Toyota models from 1999 to the present.
If the sync process in the link above doesn’t work, something may have gone wrong, or the key memory may be full (it has a limited capacity for storing key codes). The replacement ECM being defective is another possibility. At this point, you can try programming the chip.
For reprogramming the chip, you will need an EEPROM programmer. You can program it either in-circuit or off-circuit using a reset file. The reset file is the file that you will need to program (write) to the EEPROM. You may get that specific immobilizer reset file from us (FREE) in the form below:
Get the 2001-2003 Toyota RAV4 immobilizer file for FREE!
(ALWAYS check your SPAM folder in case that you don't see the download in your inbox.)
Your information is safe with us. We take privacy seriously and DO NOT sell or share your information in any way.
Your data will only be used for sending the requested document(s) and for emailing any related information or material that we might offer in any future. If we do so, you will always be provided with a link for unsubscribing if you desire to do so.
NOTE: The chip file (program) available in the form above is for the 2001-2003 RAV4 models equipped with the immobilizer system. The ECMs without the immobilizer system will NOT need this process. If in doubt, one way to know if your RAV4 has the immobilizer system or not is by checking the description in the article below:
How do I know if my 2001-2003 Toyota RAV4 has immobilizer (immo)?
You can check the article at the link below if you want to do the programming “in-circuit”. Please note that this option depends heavily on the device programmer (EEPROM programmer) you are using. Some programmers will do the job just fine while the EEPROM is in-circuit, for example, the EETools ChipMax, but others will be more sensitive and won’t work in-circuit. In that case, you will need to do it off-circuit.
Reading and Writing Immobilizer EEPROMs in circuit
To do it off-circuit, you will need to remove the EEPROM chip from the circuit board (desolder it), reprogram it, and then solder it back onto the circuit. We will be working here with the serial SPI EEPROM type “25080” (1024 bytes).
The EEPROM you will work with is near one of the two ECM microcontrollers. The EEPROM reference on the circuit board is “IC1003“. Below is a reference picture.
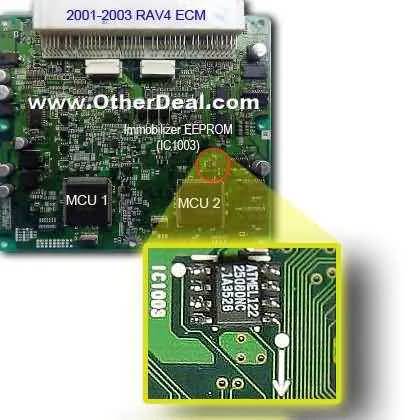
In the picture above, you can see the immobilizer EEPROM location. Note the orientation of Pin#1, as the chip must be installed in the exact same orientation when you’re done.
Below, we will remove the EEPROM and clean the soldering pads of excess solder before soldering the reprogrammed EEPROM back on. Below is a simple method.
There are, of course, better methods like using a heat gun or using the famous “ChipQuick” tool, but we are showing the less expensive way and assuming that you do not have a heat gun or the “ChipQuick”, which are not very often in a hobbyist’s or beginner’s toolbox.
Cover ALL 4 pins on each side of the EPROM with solder. Make sure the solder makes good contact with all 4 pins on each side of the chip. Use a soldering iron that is no more than 35-45 watts, or a soldering station set to 360 degrees C.
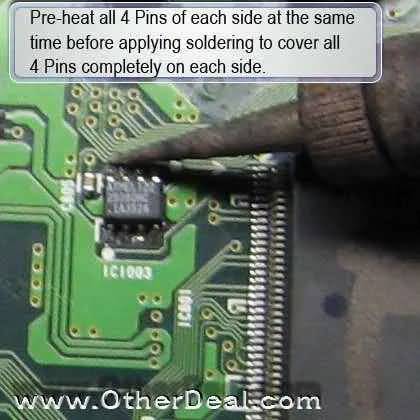
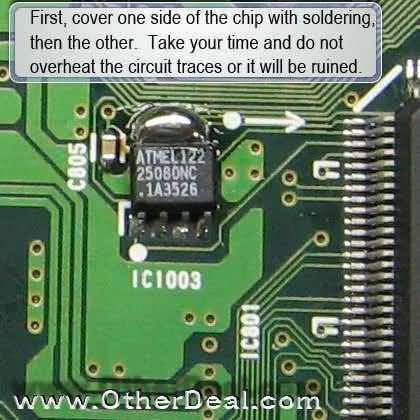
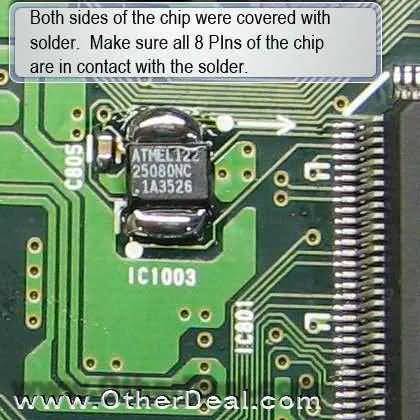
Once the EEPROM is covered with solder on both sides, hold the EEPROM with tweezers while heating both sides repeatedly until it is loose. After the chip is loose, just pull it up with the tweezers, away from the circuit board. Avoid getting molten solder in other areas of the circuit, especially in the nearby microcontroller. If it happens, remove it before you forget about it and power the ECM with it in the circuit. It can cause short circuits that can destroy the ECM beyond repair.
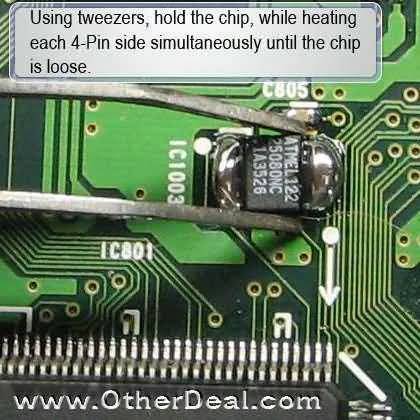
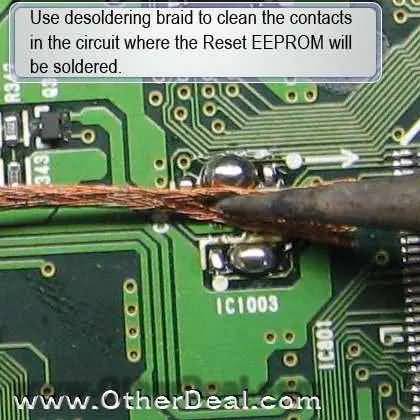
Once the EEPROM chip is out, clean off excess solder with a desoldering wick or desoldering braid. Chem-Wick is the market leader and the best one for that job. Remember: never overheat the chip when soldering, desoldering, or cleaning it.
Now program the chip by writing the given file in it, and before soldering the reprogrammed EEPROM back in place, clean from excess solder the circuit pads where the chip goes. Do it with the desoldering braid. This will make it easier to place the reprogrammed EEPROM chip.
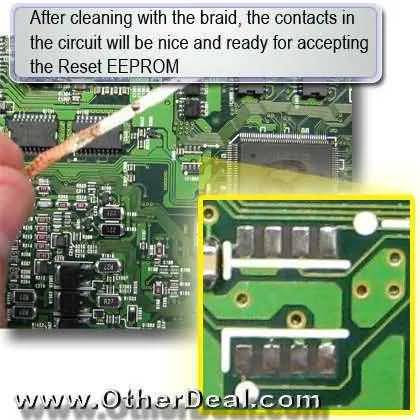
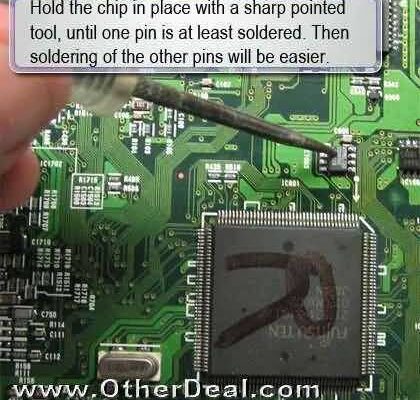
For soldering the reprogrammed EEPROM chip, put it in place and hold it with a sharp, pointed tool, while heating with the soldering iron one of the pins of the chip. This temporarily locks the chip in place while you solder the other pins. Make sure you put Pin #1 in the right place.
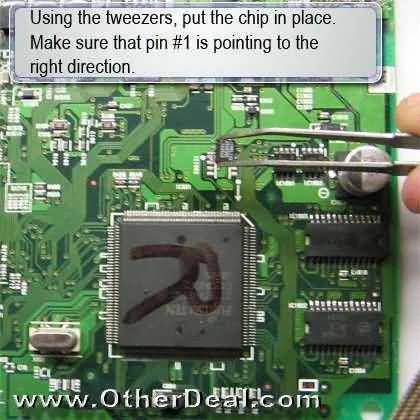
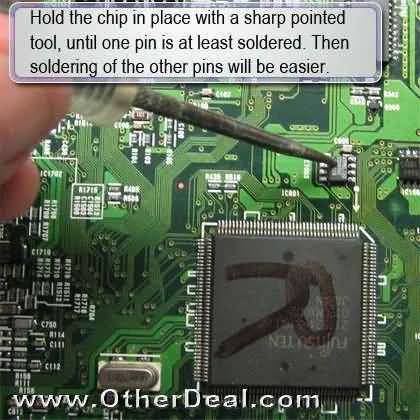
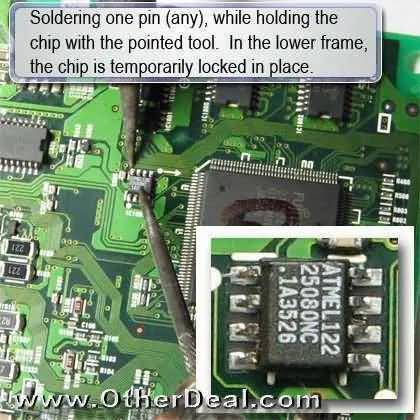
That’s it! After soldering all 8 pins of the EEPROM chip, make sure that, again, pin #1 is pointing in the right direction, make sure that there is no soldering debris on any part of the circuit, and make sure that there are no accidental solder bridges, especially in the vicinity of the microcontroller.
Now put your ECM back together and reinstall it in your RAV4. Then start the engine with all the keys you have so they register automatically.