1988 – 1991 Honda Civic / CRX Performance chip Installation
This is for the following Honda ECM computers: PM6, PW0, PR3 (OBD-0), and PR4 (OBD-0).
Installing a performance chip in a 1988 -1991 Honda Civic / CRX is a simple procedure that consists of removing (desoldering) the stock chip, soldering a 28-pin socket in its place, and inserting the performance chip in the socket.
These instructions are similar to the instructions for installing a performance chip on OBD-I Accord and Prelude ECMs elsewhere on this website. Unlike the OBD-I (1992-1995) Civic and Integra ECMs, on this OBD-0 (1988-1991) ECMs, you will not need to add extra parts. These instead have all the parts needed, as a stock chip is already installed from the factory. You just need to replace the chip. In that way, it is simpler, but tougher at the same time, because you will need to desolder the stock chip, which is held with solder on both sides, at the top and bottom of the circuit board, as these are multi-layered circuit boards.
Please note that this job requires average skills in electronics soldering, but you can always bring the ECM along with the performance chip to any TV or electronics shop, so they can install it for you. All connections should be verified before and after soldering the socket, making sure that there are no accidental solder bridges jumping any connection or any broken circuit traces caused by overheating when soldering.
Notice also that there are connections above, below, and inside the circuit board (multi-layered), which are sensitive to too much heat when soldering. Always clean the finished job with a mild solvent like 91% – 99% isopropyl alcohol.
Your car’s ECM is located at the passenger’s side kick panel or lower dash. After locating the computer in your vehicle, remove the bolts that attach it to the chassis of the vehicle, and carefully disconnect the wiring harnesses that are plugged into the ECM terminals. The wiring harnesses can be disconnected by pushing a plastic clip, located on top of each connector, and carefully pulling it back.
This installation is needed only once. Then you may pull out the chip you are using and insert any other, every time you want to switch between “Stock” and “Power” modes. These instructions cover all 1988 to 1991 (OBD-0) Honda computers that are listed at the top of this page for Civic and CRX.

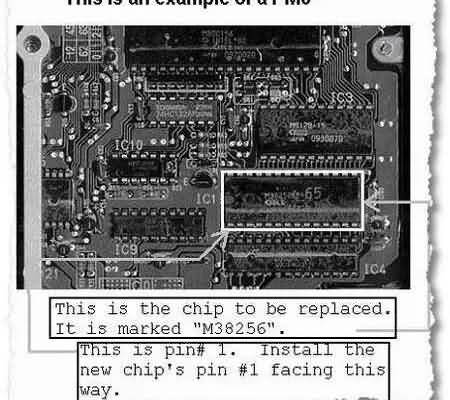
For installing the chip, just find the 28-pin chip marked as “M38256AP-xx” (see the picture below). It must be desoldered and replaced with a 28-pin DIL chip socket, and then the new performance chip can be inserted into it. Make sure that you align the chip so pin #1 goes to the same place as the old chip (lower-left corner of the chip in the picture below). No other parts are needed on these models. After inserting the chip, just put the ECM back together and reinstall it in your car.

Note: The “xx” after the “M38256AP” is different on different computers. It is the code of the program written inside the chip. The picture below is an example of PM6-A09 (65). For PW0, the code will be “71”. For the OBD-0 PR3, there are two versions, “58” and “93”, so before buying a performance chip, you should first open the ECM and check that number to make sure the chip will fit your model, as it could be different among similar models.
One good technique of removing the chip, though still requires patience, is soldering all the pins one by one, putting excess new solder, so the solder will come out easier when using any vacuum desoldering tool.
Never use a soldering iron above 35 watts with these ECMs to avoid destroying circuit copper traces and connections and damaging the chip internally. Always apply soldering flux to the area to be worked on before starting any job on the circuit. It will greatly help to do the job, as it cleans and rejuvenates soldering when heated.
After finally removing the old chip, you must clean the area with alcohol and remove excess soldering by using desoldering copper braid, and then check the whole area for broken traces of potential connection problems before you solder the 28-pin socket in place.
If you need a copy of the old stock chip for any reason, like for emission tests, you may contact OtherDeal.com to order it. Just drop a quick message at the contact form with the details on what you need for a quote on the item and shipment prices.