Valve Adjustment on OBD-I Prelude
The following process will cover the DOHC engine of the 1993-1995 Honda Prelude (OBD-I)
1 – With the engine cold, remove the upper timing belt cover, the valve cover, the spark plugs, and the distributor cap.
The exhaust and intake valves are both adjusted at the same time.
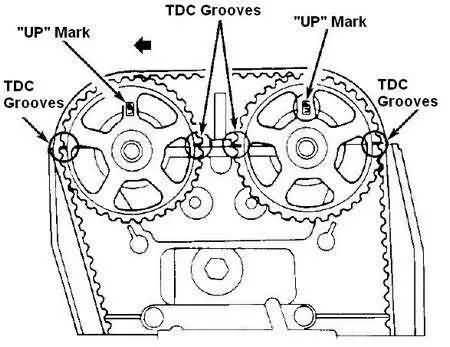
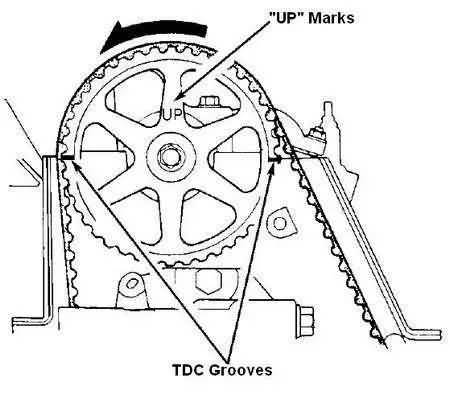
2 – Rotate the crankshaft until piston number one is at TDC on the compression stroke. To verify the position, the “UP” marks on both camshaft pulleys should be at the top, as in the illustration below, and the TDC grooves on these same pulleys should align with the cylinder head surface.
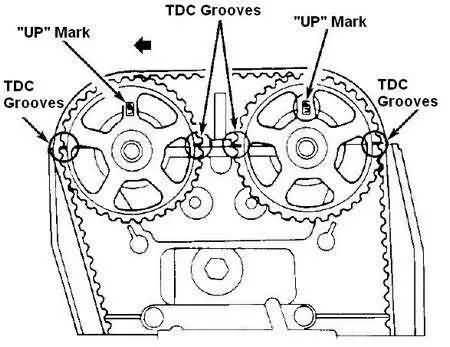
Also, check the distributor rotor. It must point to the wire for spark plug #1 on the ignition cap.
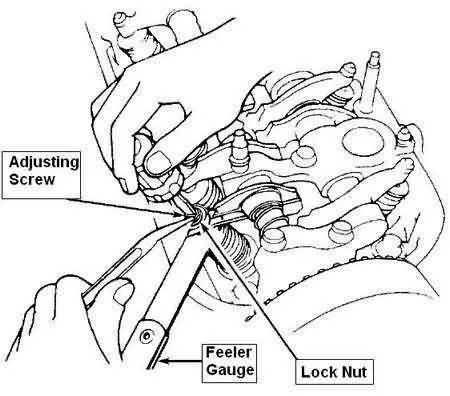
3 – Now, loosen the lock nuts on the valves of cylinder #1 and then adjust the valve clearances to the following specifications:
2.2L H22 Engine:
Intake Valves: 0.009 – 0.011 In. (0.23 – 0.28 mm)
Exhaust Valves: 0.011 – 0.013 In. (0.28 – 0.32 mm)
4 – After finishing adjusting the clearances of valves on cylinder #1, tighten the valve adjuster lock nuts to a torque of 15 ft-lbs (20 N.m.) and recheck the valve clearance. Readjust the clearance if necessary. It must be well calibrated before going to the next cylinder.
5 – After finishing cylinder #1, rotate the crankshaft counter-clockwise 180 degrees. Make sure that cylinder #3 is at TDC and adjust the valve clearances as you did on cylinder #1.
Again, tighten the adjuster lock nuts to the same torque and recheck/readjust as necessary.
For cylinders 2 and 4, repeat steps 3 to 5.
Automotive Products, Services, and Articles
Finally, reinstall the valve cover and distributor cap. Tighten the timing cover bolts and the valve cover crown-shaped nuts to a torque of 7 in-lb or 10 N.m.
For the SOHC (2.3L) engine, the process is similar. Just the valve clearances are different:
2.3L H23 Engine:
Intake Valves: 0.003 – 0.004 In. (0.07 – 0.11 mm)
Exhaust Valves: 0.006 – 0.007 In. (0.15 – 0.19 mm)
Automotive Products, Services, and Articles